下载和安装elasticsearch
elasticsearch的github地址是:https://github.com/elastic/elasticsearch/tree/7.1
在es的github地址上选择指定的版本即可,如我这里选择的是7.1的版本。
elasticsearch的官方地址:https://www.elastic.co/guide/en/elasticsearch/reference/7.1/setup.html#jvm-version
在es的官方地址选择指定版本,即可查看相应版本的文档,如我这里选择的是7.1版本。
在elasticsearch的官方文档中,有对JVM版本的说明、所支持的平台,在elasticsearch安装包中有内置版本jvm,这是推荐的JVM版本,位于elasticsearch主目录的jdk目录中。当然也可以使用自己提供的jvm版本,但必须与指定版本的elasticsearch版本相匹配,否则elasticsearch将启动失败。
在elasticsearch中文社区中,可以下载到指定版本的elasticsearch,有内置jvm版本elasticsearch、也有no jdk版本的elasticsearch,elasticsearch中文社区地址是:https://elasticsearch.cn/download/
我这里下载的是 elasticsearch-7.1.0-linux-x86_64.tar.gz,内置了指定版本的 jvm。
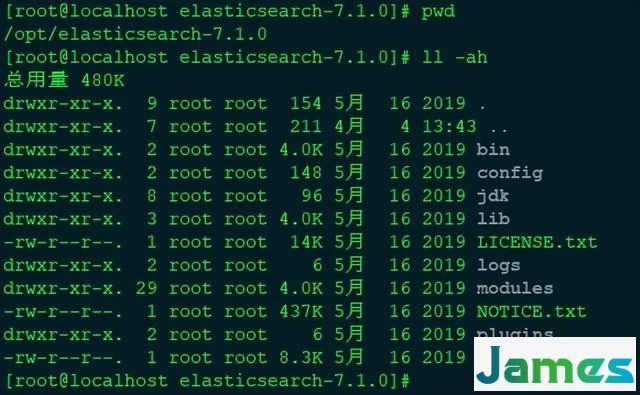
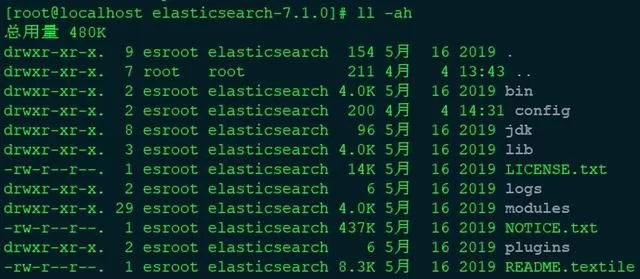
elasticsearch文件目录结构
es文件目录结构
elasticsearch jvm配置
jvm配置文件位于 config/jvm.options,7.1下载的默认配置是1GB(ES 安装后默认设置的堆内存是 1GB)。生产环境的建议配置如下:
1、jvm堆内存最小值(Xms)与最大值(Xmx)的大小是相同,以防止elasticsearch程序在运行时改变堆jvm内存大小,这是一个很耗系统资源的过程。
2、Xmx 不要超过机器内存的 50%。我的虚拟机内存是7GB,因此设置Xmx=2GB
3、不要超过 30GB (https://www.elastic.co/blog/a-heap-of-trouble)。
4、禁止swap,一旦允许内存与磁盘的交换,会引起致命的性能问题。swap空间是一块磁盘空间,操作系统使用这块空间保存从内存中换出的操作系统不常用page数据,这样可以分配出更多的内存做page cache。这样通常会提升系统的吞吐量和IO性能,但同样会产生很多问题。页面频繁换入换出会产生IO读写、操作系统中断,这些都很影响系统的性能。这个值越大操作系统就会更加积极地使用swap空间。通过elasticsearch.yml 中 bootstrap.memory_lock: true, 以保持JVM锁定内存,保证ES的性能。
参考文章
Elasticsearch主要配置及性能调优
https://blog.51cto.com/kbsonlong/2112729
ElasticSearch读写底层原理及性能调优
https://www.toutiao.com/article/6867342311852868107/?app=news_article×tamp=1648903562&use_new_style=1&req_id=20220402204601010131035194050A5588&group_id=6867342311852868107&wxshare_count=1&tt_from=weixin&utm_source=weixin&utm_medium=toutiao_android&utm_campaign=client_share&share_token=dcda70e1-0e3d-4753-8fe5-3a9f81f4ee4f
elasticsearch 系统配置
1、Linux中每个进程默认打开的最大文件句柄数是1000,对于服务器进程来说,显然太小,通过修改/etc/security/limits.conf来增大打开最大句柄数。
根据limits.conf文件的指引,这里我给 esroot 用户设置nofile的值为65535(即esroot用户最大可以打开65535个文件句柄,系统其他用户打开的文件句柄数不变) ,因此在/etc/security/limits.conf文件中增加如下内容:
esroot soft nofile 65535
esroot hard nofile 65535
或者
esroot - nofile 65535
配置完成后,使用 su - esroot 命令切换到 esroot 用户(或者推出重新登陆该用户),使用下面2个命令查看当前数量 ulimit -Hn、ulimit -Sn ,或直接使用 ulimit -n 查看即可。
2、调整vm.max_map_count的大小
max_map_count文件包含限制一个进程可以拥有的VMA(虚拟内存区域)的数量。
报错“max virtual memory areas vm.max_map_count [65530] is too low, increase to at least [262144]”
查看当前值:sysctl -a | grep vm.max_map_count
修改 /etc/sysctl.conf,添加 :
vm.max_map_count = 262144
然后 sysctl -p 生效
启动elasticsearch
为了安全,elasticsearch不允许使用root用户启动,新建普通用户esroot并设置好密码,新建组elasticsearch:
groupadd elasticsearch # 新增elasticsearch组,cat /etc/group
useradd esroot # 新增esroot用户,cat /etc/shadow
passwd esroot # 设置esroot用户密码
##将elasticsearch-7.1.0目录及其内部文件所属用户设置成esroot,所属用户组设置成elasticsearch
chown -R esroot:elasticsearch elasticsearch-7.1.0
切换用户到 esroot:su - esroot
单机启动 elasticsearch:cd /opt/elasticsearch-7.1.0/bin/
#当前进程启动
./elasticsearch
#后台进程启动
./elasticsearch -d
#浏览器输入:http://ip:9200,即可访问elasticsearch集群(这里只启动了单个节点)
启动发现如下的warn日志:
在/etc/security/limits.conf文件中增加:esroot - memlock unlimited
ps -ef | grep -v grep | grep java 命令,可以看到启动了3个java进程,即启动了3个elasticsearch实例
通过浏览器访问:http://192.168.43.99:9200/_cat/nodes,即可看到集群中的实例信息,但我这里是如下信息:
说明多实例集群启动失败。见"集群配置"
参考文章
ES节点memory lock重要性与实现方式
https://elasticsearch.cn/article/149
安装elasticsearch 总结:
1、新增elasticsearch组,cat /etc/groupgroupadd elasticsearch2、# 新增esroot用户,cat /etc/shadowuseradd esroot3、设置esroot用户密码passwd esroot 4、将elasticsearch-7.1.0目录及其内部文件所属用户设置成esroot,所属用户组设置成elasticsearch chown -R esroot:elasticsearch elasticsearch-7.1.05、编辑/etc/security/limits.conf,新增如下内容:esroot - nofile 65535esroot - memlock unlimited6、编辑/etc/sysctl.conf,新增如下内容:vm.max_map_count = 262144然后 sysctl -p 生效7、编辑config/elasticsearch.ymlnode.name: node-1network.host: 0.0.0.0 # 解决浏览器显示无法访问问题cluster.initial_master_nodes: ["node-1"]8、单机启动 elasticsearch# su - esroot# cd /opt/elasticsearch-7.1.0/bin/#当前进程启动./elasticsearch#后台进程启动./elasticsearch -d故障排除
浏览器显示无法访问
[root@es ~ ]$>vi /app/elasticsearch-7.6.0/config/elasticsearch.ymlnetwork.host: 0.0.0.0 #将192.168的地址改成0.0.0.0报错1]: max file descriptors [4096] for elasticsearch process is too low, increase to at least [65535]**
解决办法:
[root@es ~ ]$>vi /etc/security/limits.conf #文件的最后面添加- soft nofile 65536- hard nofile 68836[root@es ~ ]$>vi /etc/profile #文件的最后面添加ulimit -SHn 65536[root@es ~ ]$>source /etc/profile[root@es ~ ]$>ulimit -Hn #查看文件描述符,变成6553665536报错2、 the default discovery settings are unsuitable for production use; at least one of [discovery.seed_hosts, discovery.seed_providers, cluster.initial_master_nodes] must be configured
解决办法:
[root@es ~ ]$>vi /app/elasticsearch-7.6.0/config/elasticsearch.ymlcluster.initial_master_nodes: ["node-1"] #取消注释,保留"node-1"停止elasticsearch
https://www.elastic.co/guide/en/elasticsearch/reference/7.1/stopping-elasticsearch.html
kill 命令用于删除执行中的程序或工作。
kill 可以将指定的信息送至程序。预设的信息为 SIGTERM(15),可将指定程序终止。若仍无法终止该程序,可使用 SIGKILL(9) 信息尝试强制删除程序。
kill 编号 进程id
使用 kill -l 命令列出所有可用信号。最常用的信号是:
1 (HUP):重新加载进程。
9 (KILL):杀死一个进程。
15 (TERM):正常停止一个进程。
正常停止elasticsearch进程,kill -SIGTERM 15516 或 kill -15 15516
集群配置
由于资源有限,我这里只启动了一台虚拟机,因此在一台机器上部署3个elasticsearch实例来实现elasticsearch集群部署。
先配置第1个elasticsearch实例:
# 集群名称cluster.name: myEsCluster# 集群当前节点的名称node.name: node1bootstrap.memory_lock: true# http访问的地址,可配置成:0.0.0.0network.host: 192.168.43.99# http访问的端口,如 http://network.host:http.porthttp.port: 9200# 集群通信的端口,默认值是9300transport.tcp.port: 9300# 集群中的节点discovery.seed_hosts: ["192.168.43.99:9300", "192.168.43.99:9301", "192.168.43.99:9302"]cluster.initial_master_nodes: ["node1", "node2", "node3"]基于配置好的第1个节点,拷贝出另外2个节点:
cp -ar elasticsearch-node1 elasticsearch-node2
cp -ar elasticsearch-node1 elasticsearch-node3
分别修改第2、3个节点的配置。
# 集群名称cluster.name: myEsCluster# 集群当前节点的名称node.name: node2bootstrap.memory_lock: true# http访问的地址,可配置成:0.0.0.0network.host: 192.168.43.99# http访问的端口,如 http://network.host:http.porthttp.port: 9201# 集群通信的端口,默认值是9300transport.tcp.port: 9301# 集群中的节点discovery.seed_hosts: ["192.168.43.99:9300", "192.168.43.99:9301", "192.168.43.99:9302"]cluster.initial_master_nodes: ["node1", "node2", "node3"]cluster.name: myEsCluster必须相同,因为是在同一个集群中,只需修改 http.port、transport.tcp.port即可,因为是在同一台机器,端口号不能相同。
# 集群名称cluster.name: myEsCluster# 集群当前节点的名称node.name: node3bootstrap.memory_lock: true# http访问的地址,可配置成:0.0.0.0network.host: 192.168.43.99# http访问的端口,如 http://network.host:http.porthttp.port: 9202# 集群通信的端口,默认值是9300transport.tcp.port: 9302# 集群中的节点discovery.seed_hosts: ["192.168.43.99:9300", "192.168.43.99:9301", "192.168.43.99:9302"]cluster.initial_master_nodes: ["node1", "node2", "node3"]分别启动elasticsearch-node1、elasticsearch-node2、elasticsearch-node3实例。
http://192.168.43.99:9201/_cat/nodes
http://192.168.43.99:9202/_cat/nodes
http://192.168.43.99:9203/_cat/nodes
都可以访问到集群信息。
http://192.168.43.99:9201/
elasticsearch.yml官网配置介绍
Network Settings
https://www.elastic.co/guide/en/elasticsearch/reference/7.1/modules-network.html
Discovery and cluster formation
https://www.elastic.co/guide/en/elasticsearch/reference/7.1/modules-discovery.html
https://www.elastic.co/guide/en/elasticsearch/reference/7.1/discovery-settings.html
安装elasticsearch插件
插件介绍官方地址:https://www.elastic.co/guide/en/elasticsearch/plugins/7.1/intro.html
elasticsearch的插件分为两类:核心插件、社区贡献的插件。
核心插件的github地址是:https://github.com/elastic/elasticsearch/tree/master/plugins
使用 ./elasticsearch-plugin list 命令即可查看已经安装的插件,./elasticsearch-plugin可以查看、安装、移除插件
如现在安装analysis-icu插件(国际化的分词插件):./elasticsearch-plugin install analysis-icu
重新启动elasticsearch,浏览器中访问:http://192.168.43.99:9200/_cat/plugins,即可看到已安装好的插件:
下载和安装head插件
参考腾讯云社区文章:https://cloud.tencent.com/developer/article/1499057
下载和安装Kibana
下载地址:https://elasticsearch.cn/download/#seg-2
下载指定版本的Kibana,如我这里下载的版本是7.1.0,因为我的elasticsearch版本是7.1.0。
将下载的 Kibana 通过rz命令上传到服务器并解压,配置 config/kibana.yml:
server.port: 5601
server.host: "192.168.43.99"
elasticsearch.hosts: ["http://192.168.43.99:9200", "http://192.168.43.99:9201", "http://192.168.43.99:9202"]
进入bin目录下即可启动kibana,启动后通过浏览器即可访问:http://192.168.43.99:5601/
[esroot@localhost bin]$ ./kibana
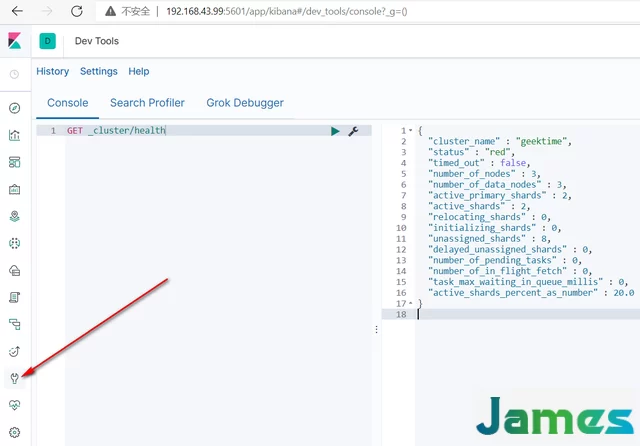
进入Dev Tools,即可操作es,就像head插件一样操作es。
kibana插件
elasticSearch监控工具cerebro
https://www.jianshu.com/p/433d821f9667
扩展知识
limits.conf
该文件位于 /etc/security/limits.conf,格式如下:<domain> <type> <item> <value>
domain
username | @groupname:设置需要被限制的用户名,组名前面加@和用户名区别。*表示所有用户(注意有的系统不支持)。
type
soft,hard 和 -,soft 指的是当前系统生效的设置值。hard 表明系统中所能设定的最大值。soft 的限制不能比har 限制高。用 - 就表明同时设置了 soft 和 hard 的值。
item
参考 limits.conf 文件指引。

